I’m going to do something a bit out of the ordinary for this post today, and make a tutorial instead of rules or announcements! If you’ve been working on a game, and you have the rules all done but no character sheet, this can be an easy way to get started with tools you may already have around the house!
This tutorial will show you how to use HTML, CSS, and an open source tool called WeasyPrint to quickly create character sheets for TTRPG playtests or indie releases.
WeasyPrint is a neat little piece of software to let you do book, poster, and other physical document design using web technologies. Think of it like a tool that lets you write static websites for your printer instead of your web browser. If you’d like to know more, their website has a great page on why to use WeasyPrint.
This tutorial is for you if you…
- …are already writing your TTRPG in text, and want your character sheet to be created in a text-based format as well.
- …already know at least basic HTML and CSS (but don’t worry–we’ll mostly be using tables!)1.
This tutorial might not be a good fit if you…
- …prefer a WYSIWYG editor.
- …want a gorgeous and artistic character sheet with pixel-perfect control.2
- …dislike HTML and CSS.
If you don’t already know HTML, that’s fine! There are a ton of good tutorials online (I learned from neopets.com back in 2004!), so if you don’t know HTML and CSS, pause here and go do a few of those tutorials. Done? Alright, let’s go!
Getting started
To get started, you’re going to need the following materials:
- A computer. Your operating system doesn’t matter, as long as it’s Linux, macOS, or Windows (BSDs might work, but you’re on your own!).
- A text editor. I use VS Code3 because it has a lot of plugins and I’m lazy, but there are all kinds of options out there! Other good options include KWrite, gedit, or, if you don’t want to install something new, whatever comes with your operating system. Just keep in mind that we’ll just be editing text here, so no word processors or office suites!4
- WeasyPrint. You can go ahead and follow its installation instructions for whichever operating system you’re using: Linux, macOS, or Windows.
And, most importantly, we’re going to need a game! A simple game would be best, since a simple character sheet is faster to work through in a tutorial and has fewer blocks of large repeated HTML. Let’s use SHERPA5. It’s got a nice, simple character setup with some text fields, a few ability scores, and a little tracker. Plus, half of the money from each sale goes to the NH Humane Society!
Setting up your files
For this tutorial, there are only going to be two files in question:
- The HTML file that defines the character sheet, which will be hand written.
- The PDF output file, which will be generated by WeasyPrint.
Go ahead an make a new file called SHERPA_charsheet.html in whatever folder
you’ll be working in, and open it in the text editor you chose in the Getting
started section. Each WeasyPrint input document is just a simple HTML file
that declares a required size field, so we can go ahead and create a blank
character sheet of the right size. Type the following into your document:
<html>
  <head>
    <meta charset="utf-8" />
    <title>SHERPA Character Sheet</title>
    <meta name="description" content="Character sheet for SHERPA" />

    <style>
      @page {
        size: 3.3in 2in;
        margin: 6pt;
      }
    </style>
  </head>
</html>
Whew! That’s a lot of very dense configuration. Let’s go through each tag in turn:
html- The
htmltag opens a new HTML document. Everything that goes in your document needs to go inside the HTML tag. What if something is outside of that tag? Well… it’ll still end up in the document. But it’ll probably break some formatting stuff. meta- The
metatag is used for adding all kinds of little bits of information. The first one up there, withcharset="utf-8", is responsible for telling WeasyPrint what our character set is (99.9% of the time, just do UTF-8). The second one, with the description, is used to generate the description field in the generated PDF file’s metadata. title- This one is also just used to generate a field in the PDF file’s metadata. Some PDF readers make use of the document’s embedded title for displaying things, and it also just makes the document feel more fancy.
style- This is where all of your styling is gonna go! This’ll be stuff like sizes,
font choices, shading, etc. Right now, all we need to put in it is the special
@pageat-rule to tell WeasyPrint what size we want our page to be. Since SHERPA is designed to be played on the go, we’ll specify 3.3 by 2 inches, the same size as a credit card.
Okay! Now that that’s done, let’s generate the character sheet! Run the following command in the same directory as your new HTML file:
weasyprint SHERPA_charsheet.html SHERPA_charsheed.pdf
If everything worked, you should be greeted with a file that looks like… this!

Isn’t she beautiful? Don’t worry, we’ll be adding all kinds of stuff now. This is just the beginning.
Adding simple tables
The modern TTRPG character sheet is 99% tables. That statistic being made up doesn’t make it any less true.
So, let’s go ahead and add one! Hell, let’s add two. Let’s get a little wild.
Add the following to your HTML file, after the closing </head> tag but
before the closing </html> tag:
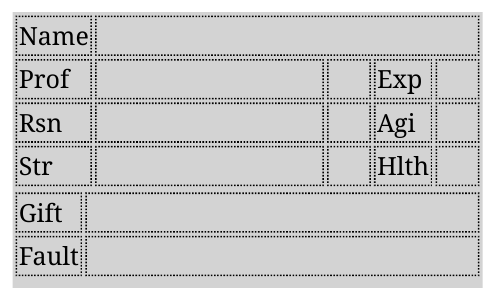
<table>
  <tr>
    <td>Name</td>
    <td colspan="4"></td>
  </tr>
  <tr>
    <td>Prof</td>
    <td></td>
    <td></td>
    <td>Exp</td>
    <td></td>
  </tr>
  <tr>
    <td>Rsn</td>
    <td colspan="2"></td>
    <td>Agi</td>
    <td></td>
  </tr>
  <tr>
    <td>Str</td>
    <td colspan="2"></td>
    <td>Hlth</td>
    <td></td>
  </tr>
</table>

<table>
  <tr>
    <td>Gift</td>
    <td>Fault</td>
  </tr>
</table>
Okay, we’ve got some new tags to go over:
table- This tag starts a new table. Technically its children should be
<thead>and<tbody>instead of just a bunch of raw<tr>children, but I usually only add<tbody>if I already have a<thead>(for reasons of laziness). tr- This tag starts a new
tablerow. HTML tables are defined as rows, not columns. You can put a<tr>inside a<thead>,<tbody>, or directly inside a<table>. For this simple sheet, we’ll do the latter. td- And finally, the
<td>tag creates a newtabledata cell (as distinct from atableheader cell, or<th>). This is where we’ll put all of our actual table content. We’ll also be using thecolspan(columnspan) androwspanattributes to merge cells when necessary.
This will create two tables, one with the character name and main stat fields, and another table that just consists of the gift and fault. Since gifts and faults might include full on mechanical descriptions, they need the most space, and will do best if they get the entire second side of the card.
While we’re at it, go ahead and put the following inside the <style> tag, just
after the @page at-tag:
html {
  background-color: lightgray;
}

td {
  border: 1px dotted grey;
}
These are a pair of CSS directives that will set a gray background on all of our usable space (so, not including margins), as well as a black dotted border around each table data cell. WeasyPrint’s HTML+CSS debugging story isn’t as good as a full web browser’s6, so adding the occasional border during active iteration can help with finding out why things might not look like you’d expect. Don’t worry though, we’ll be removing these as the last step. They’re just here to make our lives easier for now.
Okay, with that done, let’s regenerate the file and check it out:

We’re getting there!
Fixing the sizes
HTML is really good at making tables just naturally be the right size, if they have stuff in them. In this case, since this is a character sheet, the majority of the physical space will be taken up with underlined blank space, to give the players a space to write in.
Additionally, if you clicked on the PDF above, you might have noticed that we
have a white margin, and then another interior margin in the gray area. We
already configured the main margin using @page, so we should get rid of the
inner margin.
Let’s start with removing the inner margin. Add the following inside your
<style> region:
body {
  margin: 0px;
}
Now that that’s done, let’s set up these table sizes. In general, widths in character sheets should be the following:
- Labels, which are the text that’s built in to the character sheet and which tells you what a field is, should have as little space as possible devoted to them, with a tiny bit of whitespace on the sides. I’m not saying you have to squish them into a tiny little area, but any whitespace around them will feel “wasted.” If you need to fit labels of different lengths into the same column, prioritize consistent sizing over space savings where possible. This applies to all elements which are pre-printed on the sheet, including things like checkboxes.
- Numeric fields, blank spaces where you write out things like skill levels and hp/xp/money totals, should be wide enough to write the expected numbers there with a little room on the sides to help keep things readable. A field that’s only ever expected to have one digit numbers in it (stats in most systems) can be narrower than one which needs to store numbers in the tens of thousands (money, xp).
- Free form text fields, like places to write your character name, ability names like feats/stunts/talents/etc, or freeform description should be as long as you can make them.
So, with these rules in mind, let’s add the following styles:
.label {
  /* These will be automatically narrowed, but creating the class now will come
  in handy later when we're applying styling. */
}

.numeric {
  width: 1.5em;
}

.freeform {
  width: 100%;
}
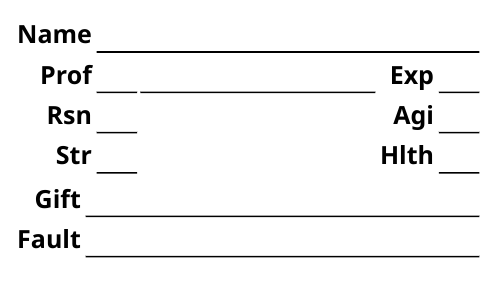
Now that we’ve set up those three classes for widths, let’s apply them. Replace both of your tables in the HTML file with this:
<table>
  <tr>
    <td class="label">Name</td>
    <td class="freeform" colspan="4"></td>
  </tr>
  <tr>
    <td class="label">Prof</td>
    <td class="freeform"></td>
    <td class="numeric"></td>
    <td class="label">Exp</td>
    <td class="numeric"></td>
  </tr>
  <tr>
    <td class="label">Rsn</td>
    <td></td>
    <td class="numeric"></td>
    <td class="label">Agi</td>
    <td></td>
  </tr>
  <tr>
    <td class="label">Str</td>
    <td></td>
    <td class="numeric"></td>
    <td class="label">Hlth</td>
    <td></td>
  </tr>
</table>

<table>
  <tr>
    <td class="label">Gift</td>
    <td class="freeform"></td>
  </tr>
  <tr>
    <td class="label">Fault</td>
    <td class="freeform"></td>
  </tr>
</table>
And let’s have a look. We’ve changed the file a lot since we started, so make sure to click the HTML link too here and see what the complete file looks like:
Nice! Now let’s make thing look a little nicer.
Styling
Let’s do the following:
- Change the font to look a little less glaring. A simple generic sans serif font should do.
- Right align labels, since they’re always on the left of their associated fields. This can be controversial! I’m a big fan of right alignment, but the important thing here is to follow your heart :)
- Add underlines to any fields that need to be written
Thankfully, these changes are pretty easy! Go ahead and replace your entire
<style> tag and its contents with the following:
<style>
  @page {
    size: 3.3in 2in;
    margin: 6pt;
  }

  body {
    font-family: sans-serif;
    margin: 0px;
  }

  .label {
    font-weight: bold;
    text-align: right;
  }

  .numeric {
    width: 1.5em;
    border-bottom: 1px solid black;
  }

  .freeform {
    width: 100%;
    border-bottom: 1px solid black;
  }
</style>
font-family: sans-serif could have been added on html instead of body, but
that’s a force of habit from doing browser-targeting web dev. Meanwhile, our
labels earned a bold font weight and a right alignment, and the two types of
fields where people need to write have gotten their underlines to make filling
them in easier.
Let’s have a look:
It’s prettier, but without all the dots it’s really obvious that there’s just a big hole there in the middle. Let’s fix that.
Adding a damage tracker
One thing I really love about character sheets is that you can put all kinds of stuff on them. Not just stat fields and trackers, but reference materials, art, really anything you want. We aren’t gonna add anything else ot this beyond just a damage tracker, but I just like talking about how much I love putting reference material on character sheets. It’s probably the old VtM player in me.
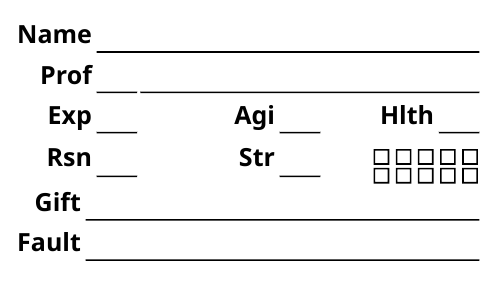
Since the six ability scores are all the same “type” of thing, and the damage tracker is its own kinda thing (even though it’s technically derived from the Hlth ability score), we’re going to be moving Exp, Agi, and Hlth into that empty space and putting the damage tracker on the side.
First, let’s just move everything to make space for the damage tracker. Remove
the existing .label declaration in the <style> area, then add the following:
table {
  width: 100%;
}

.label {
  font-weight: bold;
  text-align: right;
  width: 1%;
}
Now, update the first <table> and its contents:
<table>
  <tr>
    <td class="label">Name</td>
    <td class="freeform" colspan="7"></td>
  </tr>
  <tr>
    <td class="label">Prof</td>
    <td class="numeric"></td>
    <td class="freeform" colspan="6"></td>
  </tr>
  <tr>
    <td class="label">Exp</td>
    <td class="numeric"></td>
    <td></td>
    <td class="label">Agi</td>
    <td class="numeric"></td>
    <td></td>
    <td class="label">Hlth</td>
    <td class="numeric"></td>
  </tr>
  <tr>
    <td class="label">Rsn</td>
    <td class="numeric"></td>
    <td></td>
    <td class="label">Str</td>
    <td class="numeric"></td>
  </tr>
</table>
With that out of the way, we can start on the damage tracker. For that, we can use a bunch of little squares. Max damage is capped at Hlth which itself is capped at 10, so a five by two row should do.
Go ahead and set up the CSS to display the little squares. We’re going to need
to right align the tracker, control the height of each row of squares, and make
the little squares themselves. Add the following to your <styles>:
.ralign {
  text-align: right;
}

.tracker {
  height: 0.75em;
}

.square {
  display: inline-block;
  width: 0.5em;
  height: 0.5em;
  border: 1px solid black;
}
And now, put those to use. Add this to the last row of the first table, just
after the "numeric" field following the Str cell:
<td class="ralign" colspan="3">
  <div class="tracker">
    <span class="square"></span>
    <span class="square"></span>
    <span class="square"></span>
    <span class="square"></span>
    <span class="square"></span>
  </div>

  <div class="tracker">
    <span class="square"></span>
    <span class="square"></span>
    <span class="square"></span>
    <span class="square"></span>
    <span class="square"></span>
  </div>
</td>
And there we go! We only have two new tags here, div and span. They’re both
very simple wrappers that contain whatever is in them, but with the distinction
that <div>s don’t like to be on the same line as other elements, while
<span>s are just fine with that.
As for the finished sheet, just check it out:
![]()
Conclusion
One completed character sheet, all done. Is it pretty? Not really. Is it functional? Sure is! And it’s easy to change and undo, especially if you’re using version control.
Most of all, though, HTML and CSS are fun! It’s fun to just type a bunch of words on paper and then an entire document magically appears, and being able to cut. copy, and paste anything you could want to is wonderfully freeing.
If you wanna check out a slightly more complex character sheet that’s still built on all these basic principles, you can check out this one, which produces this output.
Anyway, let me know if you make a character sheet or other document based on these rules. I’d love to see it! As always, you can reach out to me on Mastodon or Bluesky.
Footnotes
-
For actual web work,
<grid>would make a lot more sense here than<table>, but WeasyPrint’s CSS Grid support is still pretty new. ↩ -
While CSS can do this, it’s pretty painful. WeasyPrint also uses its own rendering engine (to support pagination and physical media better), so there’s a lot of advanced CSS that it just can’t do. ↩
-
I’d switch to Codium, but MSFT has a patent lock on the remoting plugin, and I use that one almost every day. ↩
-
I haven’t forgotten about Vim/Neovim, EMACS, Helix, or any of those other fancy ones, but I figure if you’re the type of person who would notice those were missing from a list of text editors in an introductory tutorial on extremely basic HTML editing, you’re probably also the type of person who has one or more of those already installed. I also considered listing Sublime Text, but I only wanted to recommend open source (or at least open core) text editors. There’s a reason VS Code was the only one to not get a hyperlink. ↩
-
The name has aged poorly, but for a game from 1997 it could have been a lot worse. ↩
-
You can still open the HTML file in your browser and use the debug tools there, but since WeasyPrint has its own rendering engine, you won’t always be able to debug the actual issue if it only shows up there. ↩